Android studio 使用心得(四)—android studio 多渠道打包(二)
文章转自王牌软件
站长推荐:NSetup一键部署软件
一键式完成美化安装包制作,自动增量升级,数据统计,数字签名。应对各种复杂场景,脚本模块化拆分,常规复杂的脚本代码,图形化设置。无需专业的研发经验,轻松完成项目部署。(www.nsetup.cn)
只回答业务咨询

站长推荐:NSetup一键部署软件
一键式完成美化安装包制作,自动增量升级,数据统计,数字签名。应对各种复杂场景,脚本模块化拆分,常规复杂的脚本代码,图形化设置。无需专业的研发经验,轻松完成项目部署。(www.nsetup.cn)
Android studio 使用心得(四)—android studio 多渠道打包 这篇文章讲了一种打包方式。是直接在android studio 里面可视化操作,结合配置文件。我个人觉得严格上来讲是不完全正确的操作,因为配置文件里面的签名文件根本没有用到。但是,打出来的包绝对没问题的。这篇主要是介绍直接在dos命令里面使用gradle命令打包。两行命令,简单gradle clean ,gradle build。
1,配置文件还是和之前的一样,我才贴一次代码
|
1
2
3
4
5
6
7
8
9
10
11
12
13
14
15
16
17
18
19
20
21
22
23
24
25
26
27
28
29
30
31
32
33
34
35
36
37
38
39
40
41
42
43
44
45
46
47
48
49
50
51
52
53
54
55
56
57
58
59
60
61
62
63
64
65
66
67
68
69
70
71
72
73
74
75
76
77
78
79
80
81
82
83
84
85
86
87
88
89
90
91
92
93
94
95
96
97
98
99
100
101
102
103
104
105
106
107
108
109
110
111
112
113
114
115
116
117
118
119
120
121
122
123
124
125
126
127
128
129
|
apply plugin: 'com.android.application'dependencies {// <span></span>compile fileTree(dir: 'libs', include: '*.jar') compile project(':appcompat_v7_8')}buildscript { repositories { mavenCentral() } dependencies { classpath 'com.android.tools.build:gradle:1.0.0' }}android { compileSdkVersion 19 buildToolsVersion "21.0.2" sourceSets { main { manifest.srcFile 'AndroidManifest.xml' java.srcDirs = ['src'] resources.srcDirs = ['src'] aidl.srcDirs = ['src'] renderscript.srcDirs = ['src'] res.srcDirs = ['res'] assets.srcDirs = ['assets'] } // Move the tests to tests/java, tests/res, etc... instrumentTest.setRoot('tests') // Move the build types to build-types/<type> // For instance, build-types/debug/java, build-types/debug/AndroidManifest.xml, ... // This moves them out of them default location under src/<type>/... which would // conflict with src/ being used by the main source set. // Adding new build types or product flavors should be accompanied // by a similar customization. debug.setRoot('build-types/debug') release.setRoot('build-types/release') } defaultConfig { applicationId "com.example.demo4" minSdkVersion 8 targetSdkVersion 19 versionCode 1 versionName "1.0" // dex突破65535的限制 multiDexEnabled true // AndroidManifest.xml 里面UMENG_CHANNEL的value为 ${UMENG_CHANNEL_VALUE} manifestPlaceholders = [UMENG_CHANNEL_VALUE: "channel_name"] } //执行lint检查,有任何的错误或者警告提示,都会终止构建,我们可以将其关掉。 lintOptions { abortOnError false } //签名 signingConfigs { debug { storeFile file("C:/Users/xxx/.android/debug.keystore") } relealse { //这样写就得把demo.jk文件放在项目目录 storeFile file("demo.jks") storePassword "demo123456" keyAlias "demo_4" keyPassword "demo123456" } } buildTypes { debug { // 显示Log buildConfigField "boolean", "LOG_DEBUG", "true" versionNameSuffix "-debug" minifyEnabled false zipAlignEnabled false shrinkResources false signingConfig signingConfigs.debug } release { // 不显示Log buildConfigField "boolean", "LOG_DEBUG", "false" //混淆 minifyEnabled true //Zipalign优化 zipAlignEnabled true // 移除无用的resource文件 shrinkResources true //加载默认混淆配置文件 proguardFiles getDefaultProguardFile('proguard-android.txt'), 'proguard.cfg' //签名 signingConfig signingConfigs.relealse } } //渠道Flavors,我这里写了一些常用的 productFlavors { GooglePlay {} xiaomi {} umeng {} } compileOptions { sourceCompatibility JavaVersion.VERSION_1_7 targetCompatibility JavaVersion.VERSION_1_7 } productFlavors.all { flavor -> flavor.manifestPlaceholders = [UMENG_CHANNEL_VALUE: name] } applicationVariants.all { variant -> variant.outputs.each { output -> def outputFile = output.outputFile if (outputFile != null && outputFile.name.endsWith('.apk')) { def fileName = outputFile.name.replace(".apk", "-${defaultConfig.versionName}.apk") output.outputFile = new File(outputFile.parent, fileName) } } }} |
2.我们直接在dos命令定位到Demo4的项目目录(如果你用的是win7,可以直接先进入到项目目录,然后在空白处,先按住shift,再点右键选择”在此处打开命令窗口”)

a,输入命令 :gradle clean
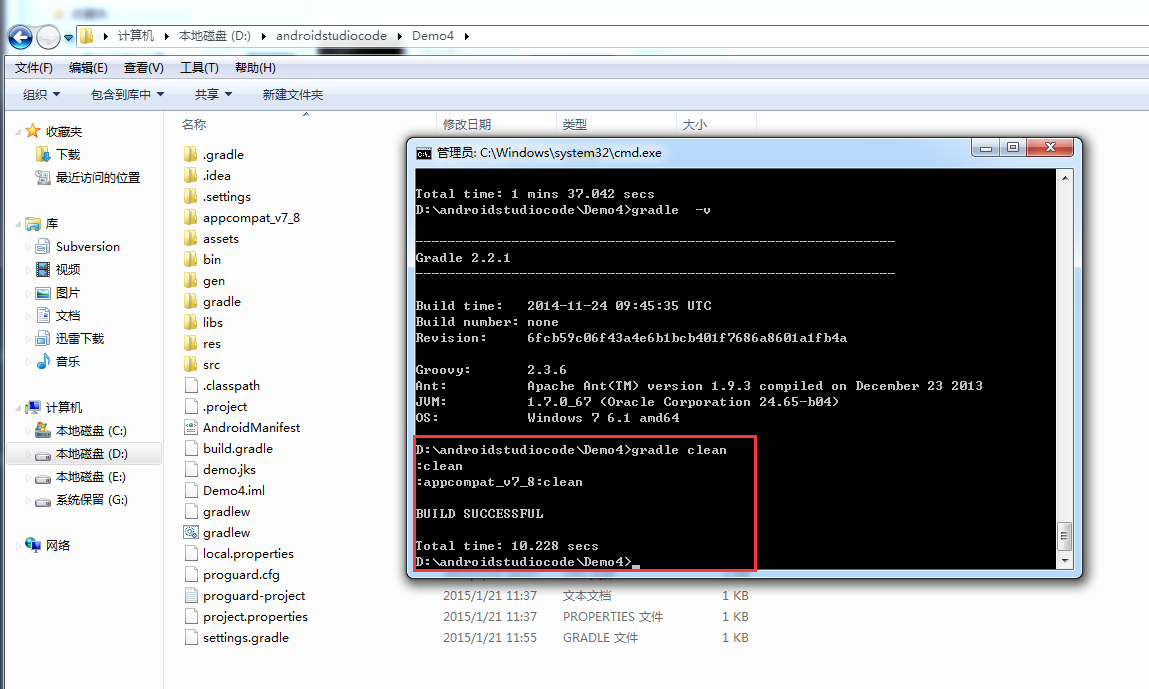
b,输入命令:gradle build 然后等待。时间会比较长
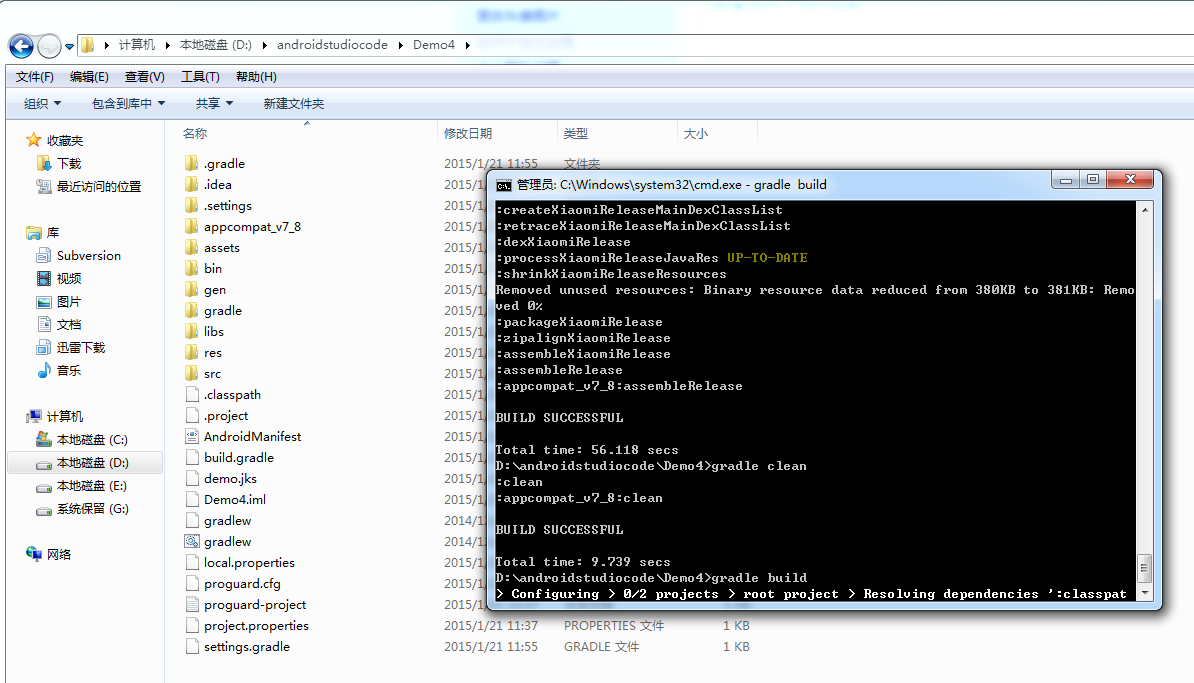
直到build successfule.细心的朋友应该会发现项目目录多了一个build文件夹。
我们打包好的apk就在里面。

大家会发现里面 debug版本,release版本都有,所以速度慢。我们一般只需要正式签名版本,所以我们在gradleclean后可以这样
输入命令:gradle assembleRelease // 这是编译并打Release的包
然后会发现时间比前面要快,而且apk文件里面只有release版本的了。

另外我们如果只想要debug版本,输入命令gradle assembleDebug //这是编译并打Debug包
学习日记,兼职软件设计,软件修改,毕业设计。
本文出自 学习日记,转载时请注明出处及相应链接。
本文永久链接: https://www.softwareace.cn/?p=1155